Start by installing WordRake for Microsoft Word:
1. To get started, close all documents and quit Microsoft Word.
2. Click the blue button (below) to download WordRake for Word.

3. Double-click the download "WordRakeInstall" file to begin installation.
4. Once installation is complete, open a Microsoft Word document and click on the WordRake tab above the ribbon.
/WR%20v5%20Ribbon%20WIN%20Word%20365_WR%20Tab.png?width=850&height=136&name=WR%20v5%20Ribbon%20WIN%20Word%20365_WR%20Tab.png)
5. To activate your license, click on the License button.


NOTE: You have access to two WordRake products, so you have two license keys.
The first one is for WordRake for Microsoft Word.
(Can’t find it? Look for the long string of characters near the bottom of the earlier email. If you can’t find that email, please contact support and we’ll help you.)
/WR%20v5%20Ribbon%20WIN%20Word%20365_Brevity.png?width=850&height=137&name=WR%20v5%20Ribbon%20WIN%20Word%20365_Brevity.png)
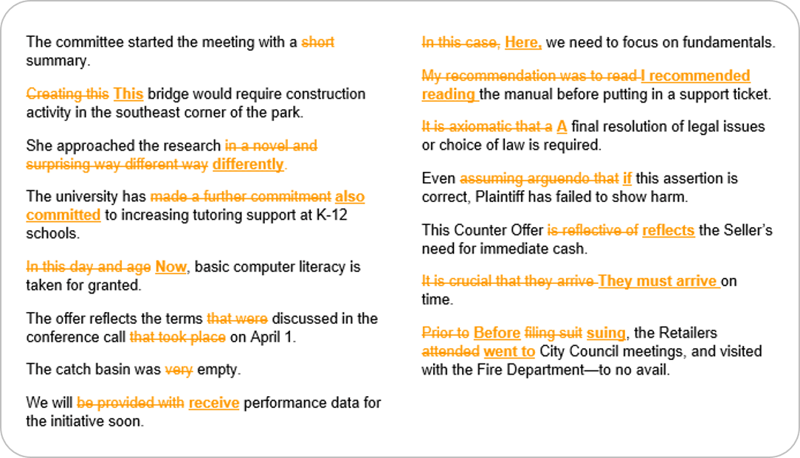
9. Next, click the Rake button and watch WordRake analyze your document and suggest improvements.
/WR%20v5%20Ribbon%20WIN%20Word%20365_Rake%20Button.png?width=850&height=149&name=WR%20v5%20Ribbon%20WIN%20Word%20365_Rake%20Button.png)
/WR%20v5%20Ribbon%20WIN%20Word%20365_Accept%20Reject%20Next.png?width=850&height=149&name=WR%20v5%20Ribbon%20WIN%20Word%20365_Accept%20Reject%20Next.png)
Now install WordRake for Microsoft Outlook:
1. To get started, close all emails and quit Microsoft Outlook.
2. Click the orange button (below) to download WordRake for Outlook.

3. Double-click the download "WordRakeOutlookInstall" file to begin installation.
4. Once installation is complete, open Microsoft Outlook and either begin a new email or reply to an existing one.
5. The WordRake tab will be visible in your open email message. Click on the WordRake tab above the ribbon.
/WR%20v5%20Ribbon%20WIN%20Outlook%20365_WR%20Tab.png?width=850&height=295&name=WR%20v5%20Ribbon%20WIN%20Outlook%20365_WR%20Tab.png)
6. To activate your license, click on the License button at the far right of your message screen.


NOTE: Because you have two WordRake products, you will have two license keys.
The second one is for WordRake for Microsoft Outlook.
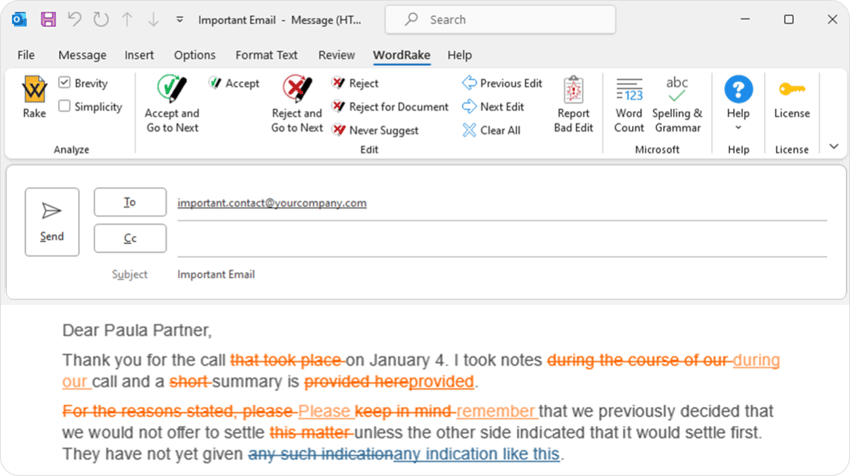
8. Follow the same steps as above to Rake an email. Your Raked email will look like this:
It’s that easy. Have questions? Please contact support and they'll be happy to help!
Additional Resources
- WordRake FAQs
- Video Walkthrough of New Features in WordRake 5.0
- Take a Tour of WordRake for Word
- Take a Tour of WordRake for Outlook
- 15 Ways to Be a WordRake Power User
- Simplicity Mode: Engaged


