15 Ways to Be a WordRake Power User
At WordRake, we understand that your editing process is personal. That’s why we provide editing suggestions in-line and give you the power to decide. When you use WordRake’s subtle and nuanced functionality, you have unmatched speed of use, clarity of corrections, and ultimate control. Get to know these features to have a more personalized experience.
- Rake a Portion of Your Document
- Set Timing Expectations
- Rake Your Document Twice
- Count Your Accepted Edits
- Review Your Edits Before Moving On
- Undo or Redo Edits
- Right Click to Accept or Reject
- Skip Around Your Document
- Bulk Accept or Reject
- Do Not Edit Quotes
- All-in-One Proofing
- Delete + Type to Edit While Raking
- Quick Access Raking
- Add Track Changes to Your WordRake Ribbon
- Rake and Track Changes/Take Credit
1. Rake a Portion of Your Document
If you write and edit in segments or collaborate with others, you’ll probably want to edit one section of a document at a time. You don’t have to wait until your document is complete to run WordRake. You can edit any portion at any time with the “partial Rake” feature. Simply select the section you’d like to analyze and click the Rake button.
/WR%20v5%20Raking%20in%20Progress%20Dialog.png?width=390&height=137&name=WR%20v5%20Raking%20in%20Progress%20Dialog.png)
2. Set Timing Expectations
After WordRake analyzes your document, you’ll receive a summary dialog box showing the number of suggested edits. That number will help you estimate how much time you’ll need to devote to reviewing and accepting edits.
Did you know you can also save your raked document and resume editing when you reopen it? If you’ve Raked a long document, review as much as you’d like, then save your document. When you next open the document, WordRake’s unresolved suggestions will still be there. You can pick up right where you left off!
/WR%20v5%20Finished%20Raking%20Dialog-1.png?width=390&height=205&name=WR%20v5%20Finished%20Raking%20Dialog-1.png)
3. Rake Your Document Twice
Did you know that you can Rake your document twice? The first Rake will look at your current document and make it clearer and better. The second Rake will look at the updated words and improve upon those.
Each time you click the Rake button, the software will analyze your text as it is currently written. That means if you’ve Raked before, you may receive new suggestions. But it also means in most cases, previously rejected edits will return, so you will need to reject those again.
Note that to Rake again, you must resolve all WordRake editing suggestions by accepting or rejecting them. If any suggestions are unresolved, you will not get new suggestions. Your Rake button will be gray. As shown below, the summary dialog box will update each time you Rake. There should be fewer suggestions upon your second Rake. Learn more about Raking twice.
/WR%20v5%20Ribbon%20WIN%20Word%20365_Analyze.png?width=980&height=178&name=WR%20v5%20Ribbon%20WIN%20Word%20365_Analyze.png)
If you prioritize simplicity and want the most editing suggestions for brevity and simplicity, you should Rake twice. First, run WordRake with only Simplicity checked. Resolve all changes. Then, run WordRake with only Brevity checked. This is because when you run both editing modes at the same time, if there is a conflict, WordRake will prioritize brevity over simplicity. (Note that the software will retain your most recently used editing mode when you open it again. To use this same approach when you edit next, you must perform these steps again.)
/WR%20v5%20Rake%20Twice%20Dialog%20with%20Arrow.png?width=937&height=218&name=WR%20v5%20Rake%20Twice%20Dialog%20with%20Arrow.png)
4. Count Your Accepted Edits
Have you ever wondered how much WordRake has helped you? In About WordRake, you can see how many times you’ve accepted WordRake edits! You can find this dialog box under Help on the WordRake ribbon.
/WR%20v5%20About%20WordRake%20Dialog%20with%20Arrow.png?width=600&height=346&name=WR%20v5%20About%20WordRake%20Dialog%20with%20Arrow.png)
If you have a new license under a new email address, or if you’ve reinstalled the program or reformatted your computer, your count may not be accurate. (I’ve had licenses under a few different email addresses, so I know my accepted edits number should be at least five digits. Still, I love quantifying how much WordRake has helped improve my writing.)
5. Review Your Edits Before Moving On
If you can’t visualize what accepting a suggested edit would look like in the context of a sentence, you can accept it and stay in place to review it. Click the smaller Accept button next to Accept and Go to Next to see how WordRake changed your document and confirm that you like the edit. If you don’t like the change, you can undo it.
/WR%20v5%20Ribbon%20WIN%20Word%20365_Accept%20Stay.png?width=972&height=157&name=WR%20v5%20Ribbon%20WIN%20Word%20365_Accept%20Stay.png)
6. Undo or Redo Edits
If you’ve just accepted or rejected a suggested edit, but you’re now questioning that decision, don’t worry. Clicking Microsoft's Undo button after accepting or rejecting an edit will return that editing suggestion to your document.
In Office 2010 or later, WordRake fully supports undo and redo. Use Microsoft Word’s built-in undo/redo function to change your mind. You can flip back and forth until you’re satisfied. You can even undo an entire Rake (though it might take a couple seconds to finish on big documents.)
/WR%20v5%20Ribbon%20WIN%20Word%20365_Undo.png?width=980&height=163&name=WR%20v5%20Ribbon%20WIN%20Word%20365_Undo.png)
7. Right Click to Accept or Reject
The fastest editors know that every mouse gesture or click away from your work counts. If you want to open and work in another tab on the ribbon while reviewing WordRake edits, you can remain on that tab and access WordRake’s buttons by simply right-clicking the edit WordRake has suggested. Right-clicking on any edit will let you accept or reject it straight from the context menu.
/WR%20v5%20365%20Ribbon%20with%20Context%20Menu%20Dialog.png?width=980&height=547&name=WR%20v5%20365%20Ribbon%20with%20Context%20Menu%20Dialog.png)
8. Skip Around in Your Document
If you’ve accepted or rejected a suggested edit and are now ready to move on, you can find the next edit by clicking the Next Edit button. You can also skip around between edits in the document using the Previous Edit and Next Edit buttons. WordRake doesn’t lock down your document, your keyboard, or your mouse during use, so you can also scroll, type, and use the cursor to click anywhere in the document to edit text independently or interact with WordRake’s edits.
/WR%20v5%20Ribbon%20WIN%20Word%20365_Navigation.png?width=974&height=169&name=WR%20v5%20Ribbon%20WIN%20Word%20365_Navigation.png)
If you don't want to click Next Edit repeatedly to skip to edits four paragraphs down, you can click on the specific edit you want to address next without confusing WordRake or removing the skipped-over edits.
9. Bulk Accept or Reject
WordRake was designed to encourage you to review every editing suggestion individually. We believe you’ll make better editing choices if you do—that’s why there’s no Accept All button. But if you want to accept or reject all suggestions in a section (for instance, if there’s a quote or provision that cannot be changed, no matter how poorly written), you can. Highlight the section you’d like to change in bulk, then click the Accept button or Reject button. When you click Accept or Reject, WordRake will accept or reject all suggestions within the current selection. This can be handy for quickly removing all suggestions from a paragraph or doing a targeted Clear All.

10. Do Not Edit Quotes
We understand that we’re not always free to edit every word in a document. WordRake won’t make any suggestions in text that has any built-in Microsoft Word quote styles applied (Quote, Intense Quote, Quote Char, Intense Quote Char, Block Quotation, and TOC Heading). Word lets you customize the appearance of these styles as well if you don’t like the default look. WordRake will also ignore text between pairs of quotation marks.

11. All-In-One Proofing
Since most people handle their editing and proofing tasks in one session, we made Microsoft Word’s built-in editing and proofing tools more accessible. We’ve added Word’s most widely used proofing features to the WordRake ribbon so you can make all of your edits from the same tab.
/WR%20v5%20Ribbon%20WIN%20Word%20365_Microsoft.png?width=972&height=178&name=WR%20v5%20Ribbon%20WIN%20Word%20365_Microsoft.png)
12. Delete + Type to Edit While Raking
Seeing WordRake’s suggestions can bring fresh perspective that sparks new ideas. If you decide you want to entirely revise some text because of a WordRake suggestion, you can delete the suggestion by pressing delete or backspace—you don’t have to accept or reject first. You can also select the suggestion and start typing.
13. Quick Access Raking
For faster editing, add WordRake’s three most important buttons (Rake + Accept and Go to Next + Reject and Go to Next) to your Quick Access toolbar. You won’t even need to go to the ribbon or work from the WordRake ribbon. Here’s a step-by-step guide to adding commands to the Quick Access toolbar.
/WR%20v5%202019%20Ribbon%20with%20Quick%20Access%20Toolbar.png?width=974&height=141&name=WR%20v5%202019%20Ribbon%20with%20Quick%20Access%20Toolbar.png)
14. Add Track Changes to Your WordRake Ribbon
We’ve added some of Microsoft Word’s most-used built-in editing and proofing tools to the WordRake ribbon. But did you know that you can totally customize the ribbons in Word and Outlook? You can add any WordRake buttons to any tab or put any buttons you want on the WordRake tab. If you use WordRake while tracking your changes, you may want to add Track Changes to your WordRake ribbon. Here’s a guide to customizing your ribbon and adding groups.
/WR%20v5%202019%20Ribbon%20with%20Track%20Changes.png?width=972&height=155&name=WR%20v5%202019%20Ribbon%20with%20Track%20Changes.png)
15. Rake and Track Changes/Take Credit
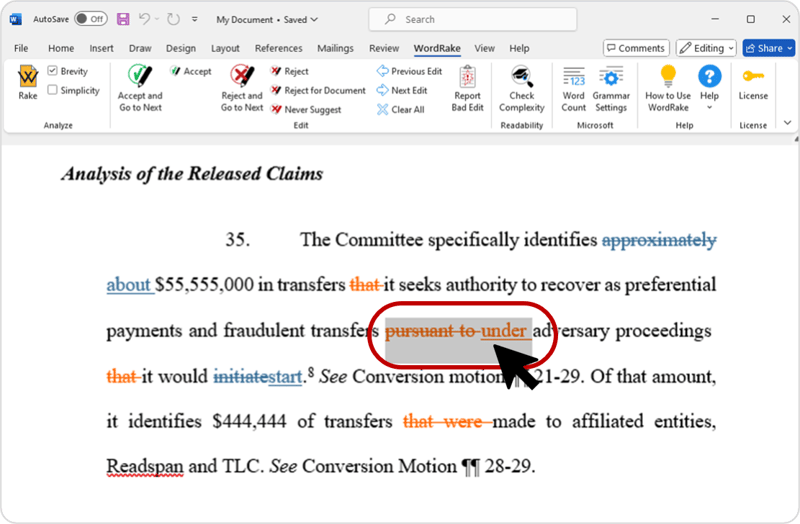
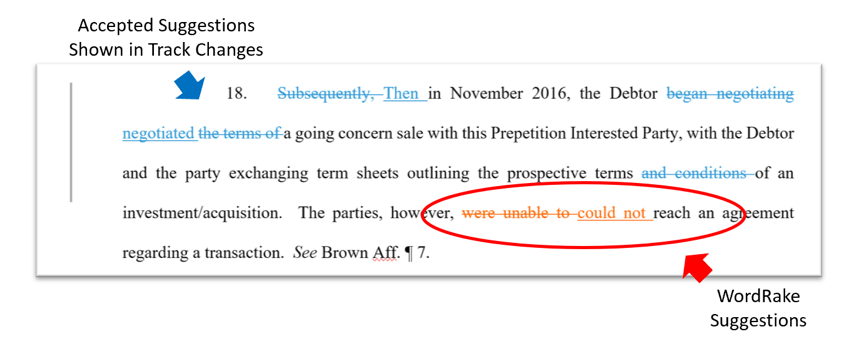
If you’re editing and Raking a document, you may want to see the difference between your edits and WordRake’s suggestions. If your default editing color is orange, you might want to change your editing color from orange to another color (like blue), so you can see the difference. Here’s how to change the color of your edits.
Alternatively, you may want to run WordRake, accept certain changes, and show them as your own (along with your own manual edits and comments). If you turn on Track Changes in a document, accepting a WordRake suggestion turns the suggestion into a tracked change with your name on it.
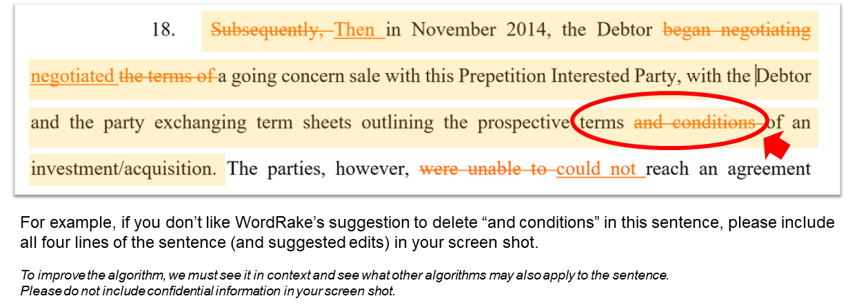
Give Us Feedback on Our Edits
Our goal is to deliver elegant, high-quality edits for smart, sophisticated writers like you. As part of our commitment to that goal, we invite you to use our new feedback form to report any edits you think could be better. When you use the form, we ask you to share a screenshot of the bad edit you're reporting. An example is below. More details are provided on the reporting form. We look forward to hearing from you.
/WR%20v5%20Ribbon%20WIN%20Word%20365_Bad%20Edit.png?width=980&height=175&name=WR%20v5%20Ribbon%20WIN%20Word%20365_Bad%20Edit.png)