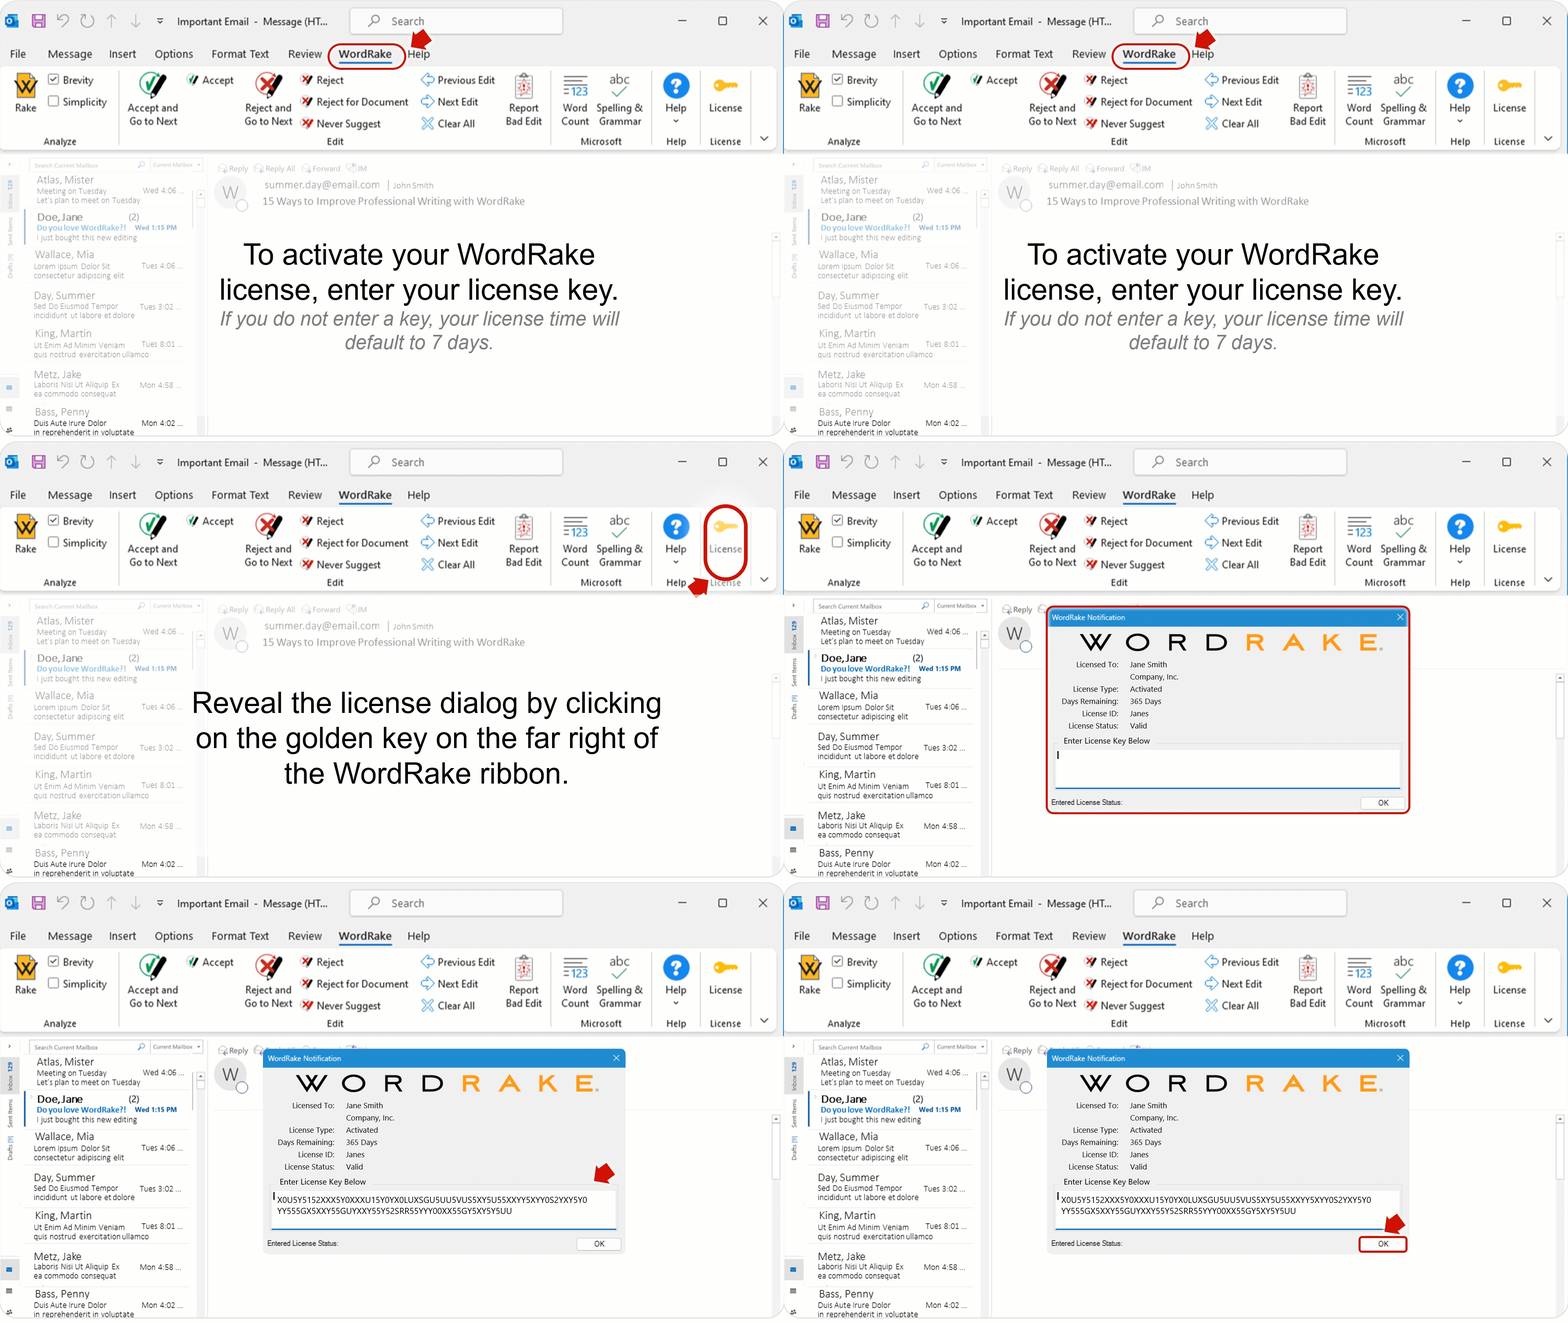
WordRake helps you edit emails to make them clear, concise, and persuasive. This tour has four parts. If you’ve already entered your license key, skip to Step 3: Editing with WordRake.
STEP 1: Accessing WordRake
The WordRake ribbon will not appear until you are working in an active email. Start a new message or begin a reply to access WordRake for Outlook.

STEP 2: Setting Up
You must activate your WordRake license before you may begin using WordRake. Copy the key, click on the License button, and paste the key into the space provided.

STEP 3: Editing with WordRake
When you click the Rake button, WordRake will analyze your text for opportunities to improve clarity and brevity. And fear not: WordRake will edit only the message you’re composing—it won’t change the message from the sender.
To start, click the WordRake tab in the ribbon/toolbar of the compose window or reading pane.
/WR%20v5%20Ribbon%20WIN%20Outlook%20365_WR%20Tab.png?width=936&height=325&name=WR%20v5%20Ribbon%20WIN%20Outlook%20365_WR%20Tab.png)
Next, check the box to tell WordRake which types of editing suggestions you’d like to receive. Select Brevity to shorten sentences or Simplicity to change complex words into familiar ones. You can select both. If you don’t choose, you will receive only Brevity suggestions.
/WR%20v5%20Ribbon%20WIN%20Outlook%20365_Brev%20or%20Simp.png?width=936&height=325&name=WR%20v5%20Ribbon%20WIN%20Outlook%20365_Brev%20or%20Simp.png)
Then, click the Rake button and watch WordRake ripple through your email. WordRake presents its suggestions in the familiar track-changes form.
/WR%20v5%20Ribbon%20WIN%20Outlook%20365_Rake%20Button.png?width=936&height=327&name=WR%20v5%20Ribbon%20WIN%20Outlook%20365_Rake%20Button.png)
WordRake is a tireless collaborator—not an editing dictator—so you’ll need to review each editing suggestion. If you like an edit, click Accept and Go to Next. If you don’t, click Reject.
/WR%20v5%20Ribbon%20WIN%20Outlook%20365_Accept%20Reject%20Next.png?width=936&height=325&name=WR%20v5%20Ribbon%20WIN%20Outlook%20365_Accept%20Reject%20Next.png)
If there’s a section of your email that can’t be changed, you can reject several suggestions at once by highlighting that section, then clicking Reject. (This also works with Accept.)
/WR%20v5%20Ribbon%20WIN%20Outlook%20365_Reject%20Stay.png?width=936&height=325&name=WR%20v5%20Ribbon%20WIN%20Outlook%20365_Reject%20Stay.png)
If you’re not sure whether you’ll like a suggested edit, try clicking the smaller Accept button. This will accept the edit, but not advance to the next suggestion, which allows you to review the accepted result in place before moving on.
/WR%20v5%20Ribbon%20WIN%20Outlook%20365_Accept%20Stay.png?width=936&height=325&name=WR%20v5%20Ribbon%20WIN%20Outlook%20365_Accept%20Stay.png)
If you change your mind after accepting or rejecting an edit, you can click Undo using Microsoft’s built-in features.
/WR%20v5%20Ribbon%20WIN%20Outlook%20365_Undo.png?width=936&height=325&name=WR%20v5%20Ribbon%20WIN%20Outlook%20365_Undo.png)
To resume editing at the next suggestion, click Next Edit.
/WR%20v5%20Ribbon%20WIN%20Outlook%20365_Navigation.png?width=936&height=325&name=WR%20v5%20Ribbon%20WIN%20Outlook%20365_Navigation.png)
Now you’re ready to Rake!
STEP 4: Exploring the Ribbon
Would you like to learn more about the options on the WordRake ribbon?
As shown below, the WordRake ribbon is divided into six categories. You’ll use the Analyze, Edit, and Navigate categories most. We covered the primary functionality in those categories in Step 3. Let’s take a closer look at two more features we think you’ll love.

Use Microsoft Features
WordRake offers shortcuts to popular Microsoft editing functions, so you can quickly and easily get the most from your software.
/WR%20v5%20Ribbon%20WIN%20Outlook%20365_Microsoft.png?width=936&height=325&name=WR%20v5%20Ribbon%20WIN%20Outlook%20365_Microsoft.png)
Users will find that the functionality and results are the same when launched from WordRake’s ribbon as when launched from Microsoft’s original locations. By having these shortcuts on WordRake’s ribbon, users can quickly access their most frequently used editing tools without leaving the WordRake ribbon.
Report a Bad Edit
We’re on a mission to regularly improve and refine WordRake’s editing algorithms, so we’d like your feedback on edits that don’t meet your expectations or that could be adjusted. Now you can provide that feedback from a button on the ribbon.
/WR%20v5%20Ribbon%20WIN%20Outlook%20365_Bad%20Edit.png?width=936&height=325&name=WR%20v5%20Ribbon%20WIN%20Outlook%20365_Bad%20Edit.png)
Because we prioritize data privacy and confidentiality, WordRake never tracks your usage and never makes or keeps records of your content, so we must rely on your feedback to improve. Please report any edits you think could be better. The suggestions are collected in a web form, which you can access from the WordRake ribbon or by bookmarking the link.
Have questions? Please contact support and they'll be happy to help!


